Labels

Showing posts with label Craftiness. Show all posts

Wednesday, January 6, 2016

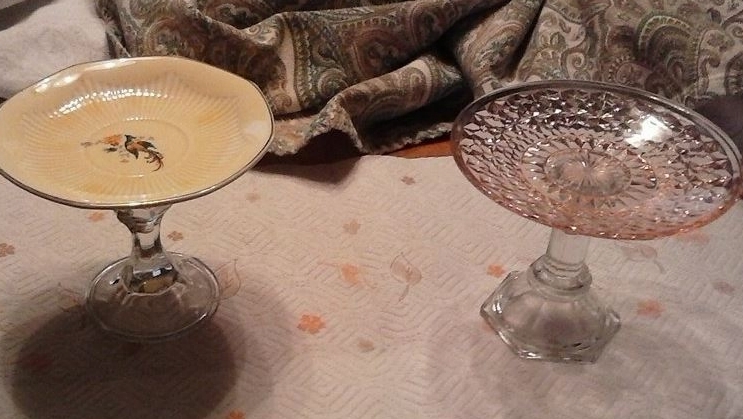
DIY Simple Plate Stands


I was gifted two pretty vintage plates. When I was given them I was told that since I am crafty, maybe I could do something special with them! It didn’t take long for me to figure out exactly what I wanted to do with them! And it seriously is one of the easiest crafts I have ever done. No joke. All you need are three simple things:

Fancy/Interesting Plates
Candlesticks (I got two from the thrift store for 25 cents each)
Superglue


Ready for the instructions? Try to keep up, it gets a little tricky!

1) Apply glue to the underside of the plate
2) Attach candlestick
3) Let dry

I know, right? Super tricky! Anyways, you could use them as a fancy stand to display cupcakes or other treats. But for me personally, they are holding various pair of earrings and jewelry.

Happy Crafting!


Monday, February 9, 2015

No Sew Skirt Refashion


Sooooooooo I love this skirt I saw on Pinterest:

Apparently you can find this skirt somewhere on Amazon. I couldn't but that is where the link lead me and I want to give credit where credit is due!
-------------------------------------------------------------------------------------------------------------
Anyways since I loved this so much I began thinking of how I could recreate it. Something you should know about me, I am ALWAYS thinking of sewing projects, or any projects really. Since I work at a fabric store it is pretty easy for me to see what I need to recreate it :) For those of you who do not sew or do not consider yourself a good sewer, I am here to report that this project is a NO SEW! Here is what you need:

1 Gray Skirt (or any color skirt if you want to add your own twist, which I encourage!)
Enough Black fabric to wrap around the bottom of the skirt (I used a remnant)
Double-sided fusible interfacing (WonderUnder)
Iron
Ironing Board
Chalk, or other marking device
Printer with ink and paper ;)
Computer  or Laptop
Scissors or Shears


1.) Go online and find a template for the wavy, scalloped edge bottom (I Googled "Scallop Edge"). Print it out and cut it out.

2.) Open up your black fabric and iron it to one side of the interfacing.

3.) Place the template on the fabric, lining up the bottom edges and corners, then trace allllllllll the way down the fabric.

My pretty kitty decided to "help"
4.) After you have traced the template, cut it out.
5.) Now this part can make you feel as though you messed up, but dont worry, I assure you that you probably didn't :) Flip your long piece of fabric over and CAREFULLY take the paper backing off of the interfacing. The paper is VERY thin and I thought that I had mistakinly bought the wrong interfacing. When you pull off the back it should look like this:
Be careful not to take the paper off too fast!
6.) Now grab your skirt and reheat your iron. Carefully line the bootm of the fabric up with the bottom of the skirt and iron. You will get a "bubble" somewhere in the black fabric beacuse you are working in a circle, not a straight line. We can get rid of that at the end.

7.) When you get to the end you want to make sure that two scallops overlap like this:
You dont want to have half of a scallop showing, that just wouldn't look right. Again since you are working in a circle, you will have that little piece sticking out at a funny angle. Go on ahead and snip it off. I reccomend that you go around and check if there are any spots that did not get ironed on all the way. I found a spot while sitting in church yesterday.

8.) There you go! Piece number 2 to add to your Pinterest closet :D
Before

After

Wednesday, January 28, 2015

Shirt to Socks Refashion


Almost everyone who is on Pinterest has a "Style" or "Dream Closet" board. I am no exception to this. I just LOVE that tulle skirt that costs $100! And those floral shorts, sooo worth $56! If only my wallet was never ending... However, the other day as I was pinning my way to sleep, an idea hit me; What if I recreate everything on my "Clothing" board! In case you didn't know, if I go a day without using my sewing machine, well, things get weird ;) I walk through the store anyway saying :Oh I could make that" "Pshhh I've made something like that before". This recreating" idea was so perfect in my mind that I couldn't sleep and instead created a new board all about refashions. Andddddddddd today marked refashion number 1!
Socks.
Sleeve Socks.
B)
Opaque Floral Knee-High Sock - $14 at Urban Outfitters. I think these socks would look so cute paired with some black or grey combat boots!Socks by Minga Berlin
I pinned these to my regular clothing board. The gray ones are from Urban Outfitters and the colorful ones are from Minga Berlin.
*********************************************************************************************************
Now for the fun part!

What you need:
1 Shirt with long sleeves
1 Seam Ripper
Lots of Pins
Threaded Sewing Maching
Chalk, or other marking device
Shears or Scissors

1.) Take your shirt and turn it inside out and using your seam ripper, take out both armhole seams.


this is NOT turned inside out

2.) Take sleeve number 1 and pin the armhole end together, still turned inside out.

3.) Next, try on your sleeve-sock thing. If you have ever turned regular jeans into skinny jeans, then this next part should be familiar to you. :) Pull and pin the fabric so that it follows the curve of your leg. It should look like this:


4.) Take your chalk and mark the line of pins.
Sorry, I used yellow. Kinda hard to see...

5.) Now head on over to your sewing machine and re-arrange the pins so that the heads are not in the path of the needle. Now follow the line and stitch your sock closed!


6.) Cut away the excess.


7.) Do the same to the other :)
8.) Strut your stuff then make your best friend a pair! ;)


BEFORE


(= AFTER =)